Filter Rule Management
Whitelist / Blacklist Management
Overview
The Whitelist and Blacklist management functionality within Filter Management allows configuration of allow (Whitelist) or block (Blacklist) rules for emails based on multiple criteria including sender address, domain, subject, content, attachments, IP addresses, and more. This helps control risks and ensure security for enterprise email systems.
Rule List Interface
Display Components
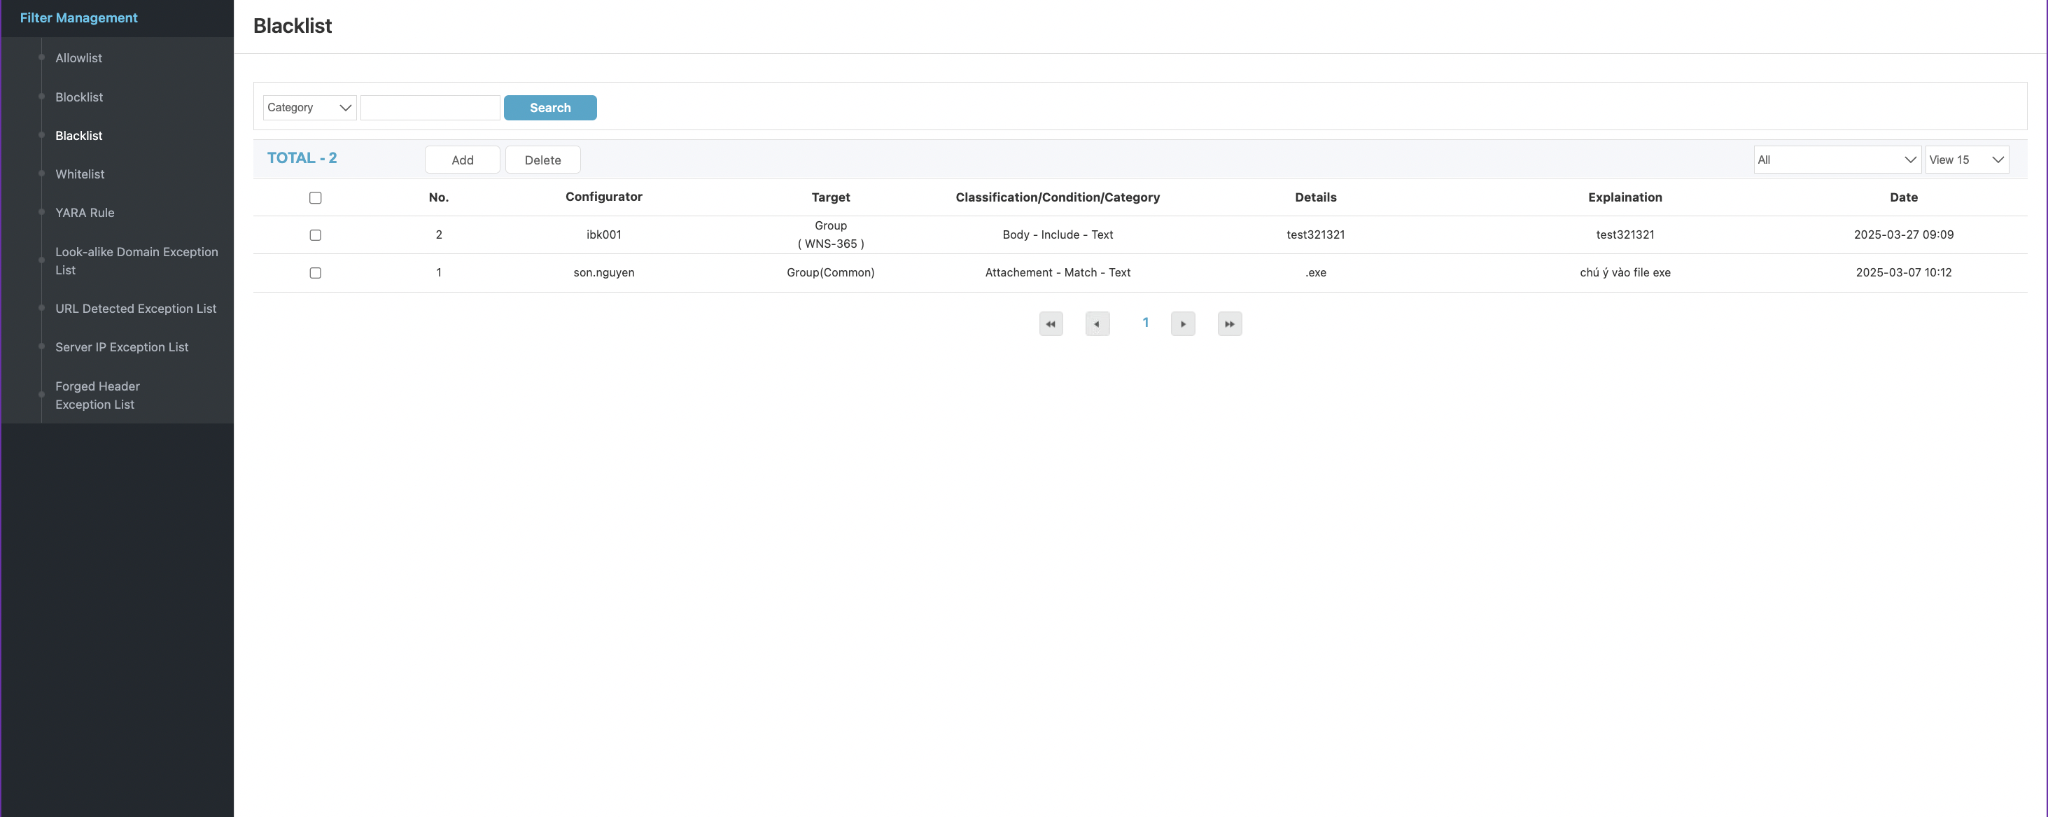
| Column | Description |
|---|---|
| No. | Rule sequence number |
| Configurator | Account that created the rule |
| Target | Application scope: Common (system-wide), Group (group-based), Individual (specific users) |
| Classification / Condition / Category | Filter condition combination including check type, matching method, and application target |
| Details | Specific value used for checking (e.g., email address, content string, file extension, etc.) |
| Explanation | Descriptive note for the rule |
| Date | Rule creation date |
Support Features
- Search - Search by condition type (Category)
- Add - Add a new rule
- Delete - Remove selected rules
- Dropdown View - Select number of rows displayed per page (e.g., 15, 30, 50, etc.)
The interface and operations are identical between Whitelist and Blacklist, differing only in purpose:
- Whitelist - Allows emails to bypass filtering checks
- Blacklist - Blocks emails matching defined conditions
Adding New Rules
When clicking Add in the Whitelist or Blacklist section, the rule configuration interface appears with the following fields:
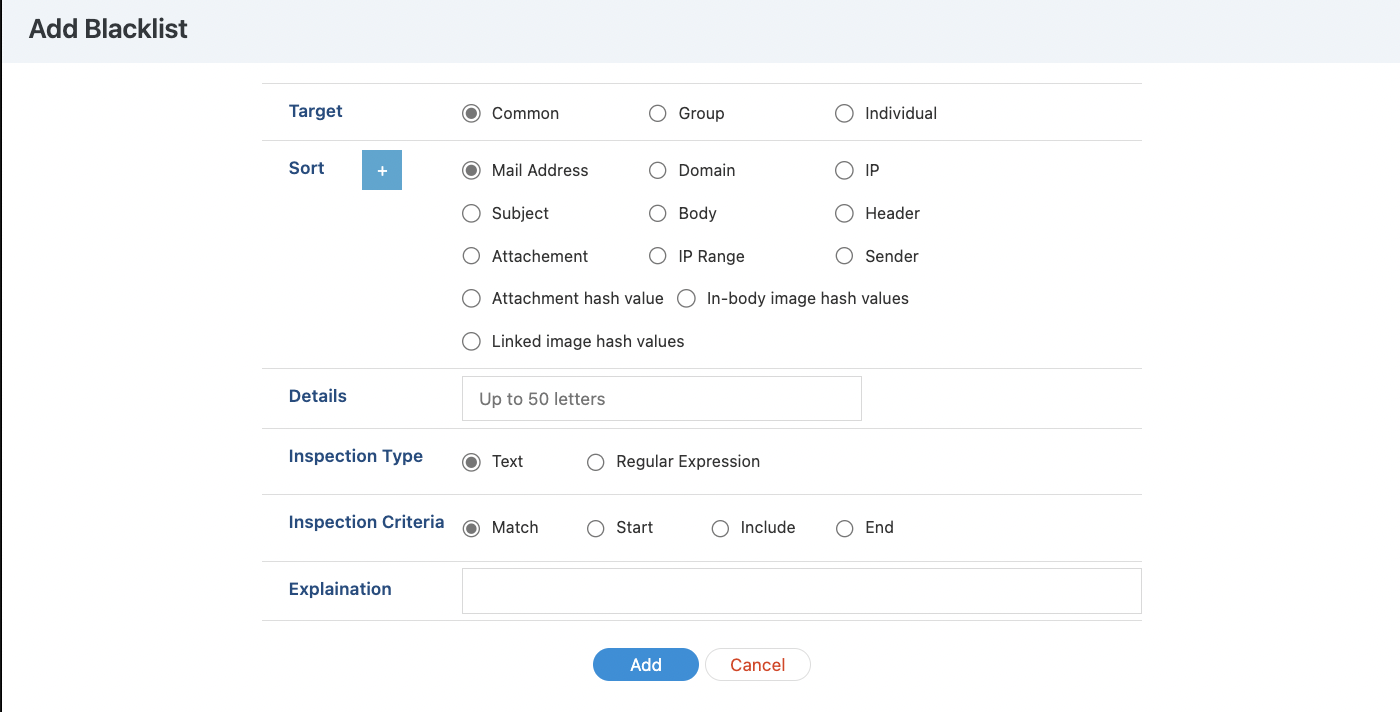
Target - Application Scope
- Common - Apply system-wide
- Group - Apply to user groups
- Individual - Apply to specific individual users
Sort - Check Target
Allows selection of element type to be checked:
| Option | Description |
|---|---|
| Mail Address / Domain / IP | Check sender address, domain, or IP |
| Subject / Body / Header | Check subject, content, or header section |
| Attachment / Attachment hash value | Check attachments or hash values |
| IP Range / Sender | Check by IP range or sender |
| In-body / Linked image hash values | Check images in content or linked images |
Details - Matching Value
- Enter content to check (maximum 50 characters)
- Examples:
.exe,marketing@spamdomain.com,test123
Inspection Type - Matching Type
- Text - Standard text string matching
- Regular Expression - Use regex for more flexible condition definition
Inspection Criteria - Matching Criteria
- Match - Exact match
- Start - Starts with string
- Include - Contains string
- End - Ends with string
Explanation - Rule Notes
Allows recording reasons or notes for easier future management (optional)
Actions
- Add - Confirm adding rule to system
- Cancel - Cancel operation and return to list
Deleting Whitelist / Blacklist Rules
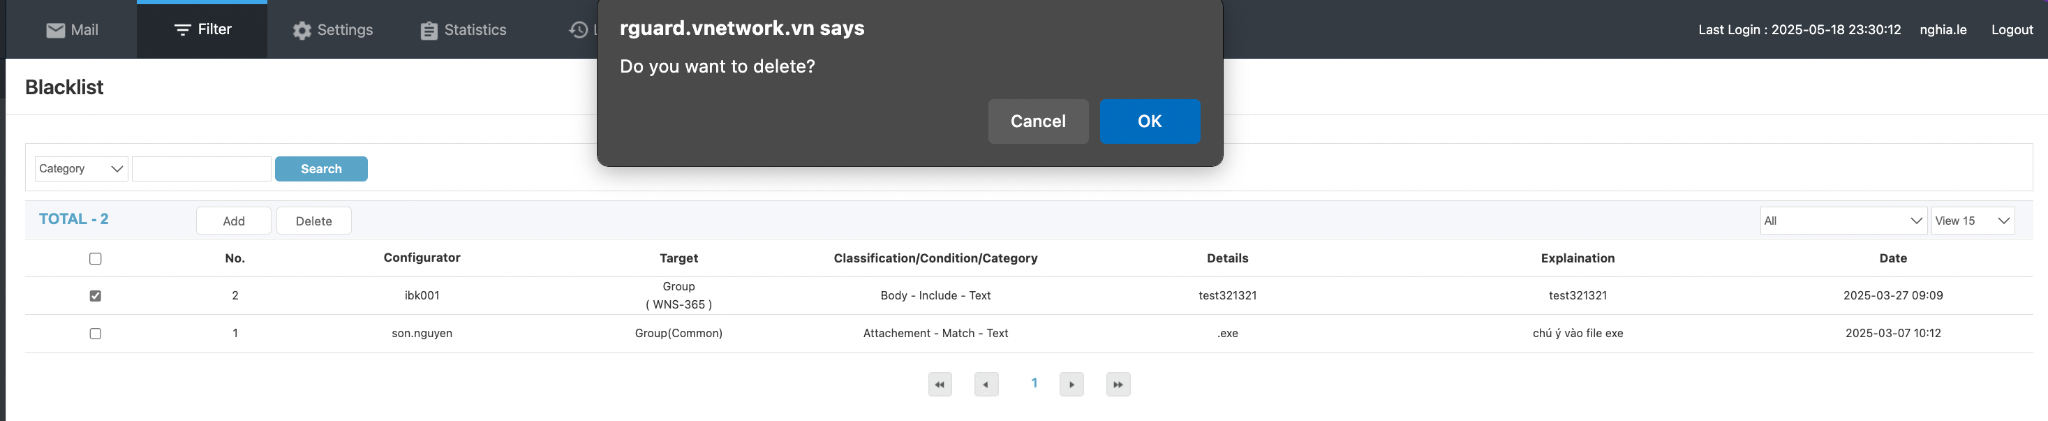
Steps to Perform
-
Access Filter Management > select Whitelist or Blacklist depending on the list to be processed.
-
In the rule list table:
- Check the checkbox at the beginning of the rule row to be deleted.
-
Click the Delete button above the list table.
-
The system will display a confirmation message with the content: “Do you want to delete?”
-
Select OK to confirm and delete the rule from the system.
- If you do not want to delete, click Cancel to cancel the operation.
Notes
- Only accounts with filter configuration permissions are allowed to perform deletion operations.
- After deletion, the rule will be removed from the checking process and will no longer affect email filtering.
YARA Rule Management - Malware Detection
Overview
YARA Rule is a functionality that supports defining and applying rules for detecting malware, dangerous code, or abnormal behavior in attachments or URLs. The system allows uploading rule files in .yara / .yar format and applying them to specific targets such as files (File) or URLs (URL).
YARA Rule Management Interface
Display Components
| Column | Description |
|---|---|
| No. | Rule sequence number |
| File Name | Name of the uploaded rule file |
| Details | Description of rule content or purpose |
| Target | Application target (File or URL) |
| Applicability | Rule application status (Applied / Not applied) |
| Configurator | Person who configured the rule |
| Date | Rule creation date |
| Result | Validation result of rule file (e.g., Suitable – appropriate) |
Operation Features
- Search: Search rules by name or description
- Add: Add new rules from
.yaraor.yarfiles - Delete: Delete selected rules
- Apply Rules: Apply uploaded rules that have not yet been activated
Adding New YARA Rule
When clicking the Add button, the YARA rule configuration interface will be displayed.
Configuration Fields
| Field | Description |
|---|---|
| File | Select rule file with .yara or .yar format. The system only accepts these two format types |
| Details | Enter brief description (maximum 20 characters) to distinguish rule purpose |
| Target | Select rule application target: File or URL |
| Applicability | Select rule application status immediately after creation (Applied) or save without applying (Not applied) |
Actions
- Add: Upload and save rule
- Cancel: Cancel the add operation
Deleting YARA Rules
Steps to Perform
- Access the YARA Rule section in the control panel.
- Check the checkboxes for the rule rows to be deleted.
- Click the Delete button.
- Confirm the deletion operation if the system displays a warning.
Notes
- Deleted rules will no longer be applied in the email content scanning process.
- Rules can be deleted at any time if they are no longer needed or are no longer appropriate.